Selasa, 11 Maret 2014

Adding An Email Domain and Mailbox

Adding An Email Domain and Mailbox

Having set up the DNS records with the DNS wizard, all mails for your domain are now being sent to your ISPConfig3 server, but without having set up an email domain and mailbox it simply doesn’t know what to do with them. The chances are it’s bouncing mails straight back to the sender saying ‘not known here!’.
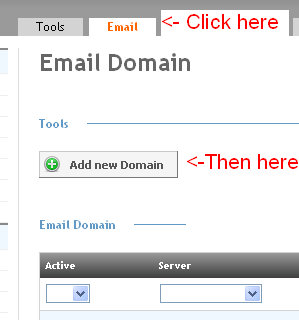
What you now need to do is add the domain to the server. Log in to your ISPConfig3 interface and click on the ‘Email’ tab.

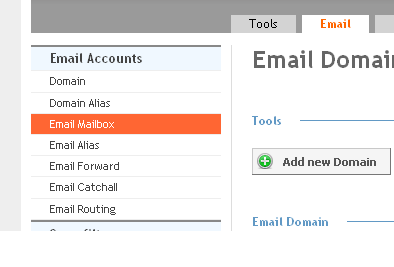
Now you need to create a mailbox so that when mail comes into your domain, your server knows where to put it. On the same ‘Email’ tab click ‘Email Mailbox’.

In the main body of the screen now click ‘+Add new Mailbox’

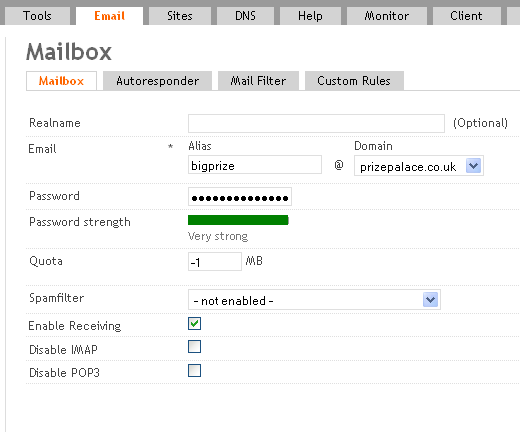
Realname will mask your email address when sending email; it’s optional.
Under ‘ailias’ type the name you want the mailbox to be called and then select the domain to the right of it that it belongs to. In the example it is set as bigprize@prizepalace.co.uk.
In the password field, choose a password you want to use for that mailbox. The greater the combination of letters, characters and numbers combined with overall length makes a strong password.
The quota field dictates the size of this mailbox. If it is set to 0 it will not allow incoming mail. Enter in here the size of this mailbox limit in megabytes. The value of -1 allows an infinite mailbox size, beware though that if this mailbox is for someone else it could fill your server!
The spamfilter refers to profiles set up to filter mail based on templates. You can create and alter these templates in another section.
You must tick ‘Enable Receiving’ to receive incoming mail.
You can disable IMAP or POP3 mail services if you don’t want the user to use either of these services,  unless you have storage concerns leave these unticked.
Click ‘Save’ which is at the bottom of the screen.

Your email account is now ready to send and receive email. Use it with your favourite mail client or webmail. If you followed the ‘Perfect Server Guide’ you will have Squirrel Mail installed that will work with your new mailbox, use your email address as a username and the password above.

* http://docs.ispconfig.org/my-first-email/

RoundCube Webmail With ISPConfig 3

Using RoundCube Webmail With ISPConfig 3 On Debian Wheezy (Apache2)


Last edited 06/06/2013
This guide explains how to install the RoundCube webmail application on a Debian Wheezy server running ISPConfig and Apache2, and how to enable the ISPConfig 3 plugins for RoundCube so that users can perform actions like changing their email passwords from within RoundCube. Roundcube webmail is a browser-based multilingual IMAP client with an application-like user interface; it comes with functions like MIME support, address book, folder manipulation, message searching and spell checking.
I do not issue any guarantee that this will work for you!

1 Preliminary Note

This tutorial assumes you are using Apache2 as the web server on your ISPConfig 3 server; this tutorial will not work for nginx. I'm going to install RoundCube from the Debian Wheezy repositories - it is a reasonably recent version (0.7.2.9 vs 0.9.1 (current stable version)).
RoundCube will be configured in such a way that it can be accessed from each vhost over the alias /webmail (e.g. http://www.example.com/webmail).
If you are already using another webmail application like SquirrelMail, make sure you disable it completely or at least the alias /webmail. If you have installed SquirrelMail as a Debian package, you can find the alias in /etc/apache2/conf.d/squirrelmail.conf; either comment out the alias to just disable the /webmail alias or comment out the whole file to disable SquirrelMail completely. Don't forget to restart Apache afterwards.

2 Creating A Remote User In ISPConfig

The ISPConfig 3 plugins for RoundCube work through ISPConfig's remote API. To use this API, we need a remote user. To create such a user, go to System > User Management > Remote Users and click on the Add new user button:


Provide a username and password for the user...


... and enable the following functions:
  • Server functions
  • Client functions
  • Mail user functions
  • Mail alias functions
  • Mail spamfilter user functions
  • Mail spamfilter policy functions
  • Mail fetchmail functions
  • Mail spamfilter whitelist functions
  • Mail spamfilter blacklist functions
  • Mail user filter functions
Then click on Save.


3 Installing RoundCube

We can install RoundCube as follows:
apt-get install roundcube roundcube-plugins roundcube-plugins-extra
You will see the following questions:
Configure database for roundcube with dbconfig-common? <-- Yes
Database type to be used by roundcube: <-- mysql
Password of the database's administrative user: <-- yourrootsqlpassword (the password of the MySQL root user)
MySQL application password for roundcube: <-- roundcubesqlpassword
Password confirmation: <-- roundcubesqlpassword
This will create a MySQL database called roundcube with the MySQL user roundcube and the password roundcubesqlpassword.
Next open /etc/apache2/conf.d/roundcube...
vi /etc/apache2/conf.d/roundcube
... and add the line Alias /webmail /var/lib/roundcube. In addition to that, add the PHP configuration to the <Directory /var/lib/roundcube/> section (I've highlighted the changes):
# Those aliases do not work properly with several hosts on your apache server
# Uncomment them to use it or adapt them to your configuration
Alias /roundcube/program/js/tiny_mce/ /usr/share/tinymce/www/
Alias /roundcube /var/lib/roundcube
Alias /webmail /var/lib/roundcube

# Access to tinymce files
<Directory "/usr/share/tinymce/www/">
      Options Indexes MultiViews FollowSymLinks
      AllowOverride None
      Order allow,deny
      allow from all
</Directory>

<Directory /var/lib/roundcube/>
  Options +FollowSymLinks
  DirectoryIndex index.php

  <IfModule mod_php5.c>
    AddType application/x-httpd-php .php

    php_flag magic_quotes_gpc Off
    php_flag track_vars On
    php_flag register_globals Off
    php_value include_path .:/usr/share/php
  </IfModule>

  # This is needed to parse /var/lib/roundcube/.htaccess. See its
  # content before setting AllowOverride to None.
  AllowOverride All
  order allow,deny
  allow from all
</Directory>

# Protecting basic directories:
<Directory /var/lib/roundcube/config>
        Options -FollowSymLinks
        AllowOverride None
</Directory>

<Directory /var/lib/roundcube/temp>
        Options -FollowSymLinks
        AllowOverride None
        Order allow,deny
        Deny from all
</Directory>

<Directory /var/lib/roundcube/logs>
        Options -FollowSymLinks
        AllowOverride None
        Order allow,deny
        Deny from all
</Directory>
Restart Apache afterwards:
/etc/init.d/apache2 restart

4 Configuring RoundCube

Open /etc/roundcube/main.inc.php...
vi /etc/roundcube/main.inc.php
... and set $rcmail_config['default_host'] = 'localhost'; (or the hostname or IP address of your mail server if it is on a remote machine):
[...]
$rcmail_config['default_host'] = 'localhost';
[...]
Otherwise RoundCube will ask for a hostname before each login which might overstrain your users - we want to make usage as easy as possible.
Next install the ISPConfig 3 plugins for RoundCube:
cd /tmp
git clone https://github.com/w2c/ispconfig3_roundcube.git
cd /tmp/ispconfig3_roundcube/
mv ispconfig3_* /var/lib/roundcube/plugins
cd /var/lib/roundcube/plugins
mv ispconfig3_account/config/config.inc.php.dist ispconfig3_account/config/config.inc.php
Open ispconfig3_account/config/config.inc.php...
vi ispconfig3_account/config/config.inc.php
... and fill in the login details of your ISPConfig remote user and the URL of the remote API - my ISPConfig installation runs on https://192.168.0.100:8080, so the URL of the remote API is https://192.168.0.100:8080/remote/:
<?php
$rcmail_config['identity_limit'] = false;
$rcmail_config['remote_soap_user'] = 'roundcube';
$rcmail_config['remote_soap_pass'] = 'Sw0wlytlRt3MY';
$rcmail_config['soap_url'] = 'https://192.168.0.100:8080/remote/';
?>
Finally open /etc/roundcube/main.inc.php again...
vi /etc/roundcube/main.inc.php
... and enable the jquerui plugin plus the ISPConfig 3 plugins...
[...]
// ----------------------------------
// PLUGINS
// ----------------------------------

// List of active plugins (in plugins/ directory)
//$rcmail_config['plugins'] = array();
$rcmail_config['plugins'] = array("jqueryui", "ispconfig3_account", "ispconfig3_autoreply", "ispconfig3_pass", "ispconfig3_spam", "ispconfig3_fetchmail", "ispconfig3_filter");
[...]
... and change the skin from default to classic (otherwise the ISPConfig 3 plugins will not work):
[...]
// skin name: folder from skins/
$rcmail_config['skin'] = 'classic';
[...]
That's it; now you can access RoundCube under the alias /webmail (e.g. www.example.com/webmail). Log in with the email address and password of an email account created through ISPConfig:


This is how RoundCube looks:


Under Settings > Account you can use the ISPconfig 3 plugins for RoundCube to modify your settings, for example...


... you can set a new password for your email account without using ISPConfig:


5 Links


Senin, 10 Maret 2014

The Perfect Server - Ubuntu 12.04 LTS (Apache2, BIND, Dovecot, ISPConfig 3)
===========================================================================

-----> Get root Privileges

After the reboot you can login with your previously created username (e.g. administrator). Because we must run all the steps from this tutorial with root privileges, we can either prepend all commands in this tutorial with the string sudo, or we become root right now by typing

$ sudo su

(You can as well enable the root login by running)

-----> Install The SSH Server (Optional)

If you did not install the OpenSSH server during the system installation, you can do it now:

$ apt-get install ssh openssh-server

From now on you can use an SSH client such as PuTTY and connect from your workstation to your Ubuntu 12.04 server and follow the remaining steps from this tutorial.

-----> Install vim-nox (Optional)

I'll use vi as my text editor in this tutorial. The default vi program has some strange behaviour on Ubuntu and Debian; to fix this, we install vim-nox:

apt-get install vim-nox

(You don't have to do this if you use a different text editor such as joe or nano.)


-----> Configure The Network

Because the Ubuntu installer has configured our system to get its network settings via DHCP, we have to change that now because a server should have a static IP address. Edit /etc/network/interfaces and adjust it to your needs (in this example setup I will use the IP address 192.168.0.100 and the DNS servers 8.8.8.8 and 8.8.4.4 - starting with Ubuntu 12.04, you cannot edit /etc/resolv.conf directly anymore, but have to specify your nameservers in your network configuration - see

man resolvconf

for more details):

vi /etc/network/interfaces


--------------------------------------------------------------------
# This file describes the network interfaces available on your system
# and how to activate them. For more information, see interfaces(5).

# The loopback network interface
auto lo
iface lo inet loopback

# The primary network interface
auto eth0
iface eth0 inet static
        address 192.168.0.100
        netmask 255.255.255.0
        network 192.168.0.0
        broadcast 192.168.0.255
        gateway 192.168.0.1
        dns-nameservers 8.8.8.8 8.8.4.4
--------------------------------------------------------------------
Then restart your network:

/etc/init.d/networking restart

Then edit /etc/hosts. Make it look like this:

vi /etc/hosts


--------------------------------------------------------------------
127.0.0.1       localhost.localdomain   localhost
192.168.0.100   server1.example.com     server1

# The following lines are desirable for IPv6 capable hosts
::1     ip6-localhost ip6-loopback
fe00::0 ip6-localnet
ff00::0 ip6-mcastprefix
ff02::1 ip6-allnodes
ff02::2 ip6-allrouters
--------------------------------------------------------------------


Now run

echo server1.example.com > /etc/hostname
/etc/init.d/hostname restart

Afterwards, run

hostname
hostname -f

Both should show server1.example.com now.


-----> Edit /etc/apt/sources.list And Update Your Linux Installation

 Edit /etc/apt/sources.list. Comment out or remove the installation CD from the file and make sure that the universe and multiverse repositories are enabled. It should look like this:

vi /etc/apt/sources.list

--------------------------------------------------------------------
#

# deb cdrom:[Ubuntu-Server 12.04 LTS _Precise Pangolin_ - Release amd64 (20120424.1)]/ dists/precise/main/binary-i386/
# deb cdrom:[Ubuntu-Server 12.04 LTS _Precise Pangolin_ - Release amd64 (20120424.1)]/ dists/precise/restricted/binary-i386/
# deb cdrom:[Ubuntu-Server 12.04 LTS _Precise Pangolin_ - Release amd64 (20120424.1)]/ precise main restricted

#deb cdrom:[Ubuntu-Server 12.04 LTS _Precise Pangolin_ - Release amd64 (20120424.1)]/ dists/precise/main/binary-i386/
#deb cdrom:[Ubuntu-Server 12.04 LTS _Precise Pangolin_ - Release amd64 (20120424.1)]/ dists/precise/restricted/binary-i386/
#deb cdrom:[Ubuntu-Server 12.04 LTS _Precise Pangolin_ - Release amd64 (20120424.1)]/ precise main restricted

# See http://help.ubuntu.com/community/UpgradeNotes for how to upgrade to
# newer versions of the distribution.
deb http://de.archive.ubuntu.com/ubuntu/ precise main restricted
deb-src http://de.archive.ubuntu.com/ubuntu/ precise main restricted

## Major bug fix updates produced after the final release of the
## distribution.
deb http://de.archive.ubuntu.com/ubuntu/ precise-updates main restricted
deb-src http://de.archive.ubuntu.com/ubuntu/ precise-updates main restricted

## N.B. software from this repository is ENTIRELY UNSUPPORTED by the Ubuntu
## team. Also, please note that software in universe WILL NOT receive any
## review or updates from the Ubuntu security team.
deb http://de.archive.ubuntu.com/ubuntu/ precise universe
deb-src http://de.archive.ubuntu.com/ubuntu/ precise universe
deb http://de.archive.ubuntu.com/ubuntu/ precise-updates universe
deb-src http://de.archive.ubuntu.com/ubuntu/ precise-updates universe

## N.B. software from this repository is ENTIRELY UNSUPPORTED by the Ubuntu
## team, and may not be under a free licence. Please satisfy yourself as to
## your rights to use the software. Also, please note that software in
## multiverse WILL NOT receive any review or updates from the Ubuntu
## security team.
deb http://de.archive.ubuntu.com/ubuntu/ precise multiverse
deb-src http://de.archive.ubuntu.com/ubuntu/ precise multiverse
deb http://de.archive.ubuntu.com/ubuntu/ precise-updates multiverse
deb-src http://de.archive.ubuntu.com/ubuntu/ precise-updates multiverse

## N.B. software from this repository may not have been tested as
## extensively as that contained in the main release, although it includes
## newer versions of some applications which may provide useful features.
## Also, please note that software in backports WILL NOT receive any review
## or updates from the Ubuntu security team.
deb http://de.archive.ubuntu.com/ubuntu/ precise-backports main restricted universe multiverse
deb-src http://de.archive.ubuntu.com/ubuntu/ precise-backports main restricted universe multiverse

deb http://security.ubuntu.com/ubuntu precise-security main restricted
deb-src http://security.ubuntu.com/ubuntu precise-security main restricted
deb http://security.ubuntu.com/ubuntu precise-security universe
deb-src http://security.ubuntu.com/ubuntu precise-security universe
deb http://security.ubuntu.com/ubuntu precise-security multiverse
deb-src http://security.ubuntu.com/ubuntu precise-security multiverse

## Uncomment the following two lines to add software from Canonical's
## 'partner' repository.
## This software is not part of Ubuntu, but is offered by Canonical and the
## respective vendors as a service to Ubuntu users.
# deb http://archive.canonical.com/ubuntu precise partner
# deb-src http://archive.canonical.com/ubuntu precise partner

## Uncomment the following two lines to add software from Ubuntu's
## 'extras' repository.
## This software is not part of Ubuntu, but is offered by third-party
## developers who want to ship their latest software.
# deb http://extras.ubuntu.com/ubuntu precise main
# deb-src http://extras.ubuntu.com/ubuntu precise main
--------------------------------------------------------------------


Then run

apt-get update

to update the apt package database and

apt-get upgrade

to install the latest updates (if there are any). If you see that a new kernel gets installed as part of the updates, you should reboot the system afterwards:

reboot

-----> Disable AppArmor

AppArmor is a security extension (similar to SELinux) that should provide extended security. In my opinion you don't need it to configure a secure system, and it usually causes more problems than advantages (think of it after you have done a week of trouble-shooting because some service wasn't working as expected, and then you find out that everything was ok, only AppArmor was causing the problem). Therefore I disable it (this is a must if you want to install ISPConfig later on).

We can disable it like this:

/etc/init.d/apparmor stop
update-rc.d -f apparmor remove
apt-get remove apparmor apparmor-utils

-----> Synchronize the System Clock

It is a good idea to synchronize the system clock with an NTP (network time protocol) server over the Internet. Simply run

apt-get install ntp ntpdate

and your system time will always be in sync.

-----> Install Postfix, Dovecot, MySQL, phpMyAdmin, rkhunter, binutils


We can install Postfix, Dovecot, MySQL, rkhunter, and binutils with a single command:

apt-get install postfix postfix-mysql postfix-doc mysql-client mysql-server openssl getmail4 rkhunter binutils dovecot-imapd dovecot-pop3d dovecot-mysql dovecot-sieve sudo

You will be asked the following questions:

New password for the MySQL "root" user: <-- yourrootsqlpassword
Repeat password for the MySQL "root" user: <-- yourrootsqlpassword
General type of mail configuration: <-- Internet Site
System mail name: <-- server1.example.com

Next open the TLS/SSL and submission ports in Postfix:

vi /etc/postfix/master.cf

Uncomment the submission and smtps sections (leave -o milter_macro_daemon_name=ORIGINATING as we don't need it):


--------------------------------------------------------------------
[...]
submission inet n       -       -       -       -       smtpd
  -o syslog_name=postfix/submission
  -o smtpd_tls_security_level=encrypt
  -o smtpd_sasl_auth_enable=yes
  -o smtpd_client_restrictions=permit_sasl_authenticated,reject
#  -o milter_macro_daemon_name=ORIGINATING
smtps     inet  n       -       -       -       -       smtpd
  -o syslog_name=postfix/smtps
  -o smtpd_tls_wrappermode=yes
  -o smtpd_sasl_auth_enable=yes
  -o smtpd_client_restrictions=permit_sasl_authenticated,reject
#  -o milter_macro_daemon_name=ORIGINATING
[...]
--------------------------------------------------------------------
Restart Postfix afterwards:

/etc/init.d/postfix restart

We want MySQL to listen on all interfaces, not just localhost, therefore we edit /etc/mysql/my.cnf and comment out the line bind-address = 127.0.0.1:

vi /etc/mysql/my.cnf


--------------------------------------------------------------------
[...]
# Instead of skip-networking the default is now to listen only on
# localhost which is more compatible and is not less secure.
#bind-address           = 127.0.0.1
[...]
--------------------------------------------------------------------

Then we restart MySQL:

/etc/init.d/mysql restart

Now check that networking is enabled. Run

netstat -tap | grep mysql

The output should look like this:

root@server1:~# netstat -tap | grep mysql
tcp        0      0 *:mysql                 *:*                     LISTEN      21298/mysqld
root@server1:~#

----->  Install Amavisd-new, SpamAssassin, And Clamav

To install amavisd-new, SpamAssassin, and ClamAV, we run

apt-get install amavisd-new spamassassin clamav clamav-daemon zoo unzip bzip2 arj nomarch lzop cabextract apt-listchanges libnet-ldap-perl libauthen-sasl-perl clamav-docs daemon libio-string-perl libio-socket-ssl-perl libnet-ident-perl zip libnet-dns-perl

The ISPConfig 3 setup uses amavisd which loads the SpamAssassin filter library internally, so we can stop SpamAssassin to free up some RAM:

/etc/init.d/spamassassin stop
update-rc.d -f spamassassin remove

----->  Install Apache2, PHP5, phpMyAdmin, FCGI, suExec, Pear, And mcrypt

Apache2, PHP5, phpMyAdmin, FCGI, suExec, Pear, and mcrypt can be installed as follows:

apt-get install apache2 apache2.2-common apache2-doc apache2-mpm-prefork apache2-utils libexpat1 ssl-cert libapache2-mod-php5 php5 php5-common php5-gd php5-mysql php5-imap phpmyadmin php5-cli php5-cgi libapache2-mod-fcgid apache2-suexec php-pear php-auth php5-curl php5-mcrypt mcrypt php5-imagick imagemagick libapache2-mod-suphp libruby libapache2-mod-ruby libapache2-mod-python libapache2-mod-perl2

You will see the following question:

Web server to reconfigure automatically: <-- apache2
Configure database for phpmyadmin with dbconfig-common? <-- No

Then run the following command to enable the Apache modules suexec, rewrite, ssl, actions, and include (plus dav, dav_fs, and auth_digest if you want to use WebDAV):

a2enmod suexec rewrite ssl actions include

a2enmod dav_fs dav auth_digest

Restart Apache afterwards:

/etc/init.d/apache2 restart

If you want to host Ruby files with the extension .rb on your web sites created through ISPConfig, you must comment out the line application/x-ruby rb in /etc/mime.types:

vi /etc/mime.types

--------------------------------------------------------------------

[...]
#application/x-ruby                             rb
[...]
--------------------------------------------------------------------


(This is needed only for .rb files; Ruby files with the extension .rbx work out of the box.)

Restart Apache afterwards:

/etc/init.d/apache2 restart

-----> Xcache

Xcache is a free and open PHP opcode cacher for caching and optimizing PHP intermediate code. It's similar to other PHP opcode cachers, such as eAccelerator and APC. It is strongly recommended to have one of these installed to speed up your PHP page.

Xcache can be installed as follows:

apt-get install php5-xcache

Now restart Apache:

/etc/init.d/apache2 restart


-----> PHP-FPM

Starting with the upcoming ISPConfig 3.0.5, there will be an additional PHP mode that you can select for usage with Apache: PHP-FPM. If you plan to use this PHP mode, it makes sense to configure your system for it now so that later on when you upgrade to ISPConfig 3.0.5, your system is prepared (the latest ISPConfig version at the time of this writing is ISPConfig 3.0.4.4).

To use PHP-FPM with Apache, we need the mod_fastcgi Apache module (please don't mix this up with mod_fcgid - they are very similar, but you cannot use PHP-FPM with mod_fcgid). We can install PHP-FPM and mod_fastcgi as follows:

apt-get install libapache2-mod-fastcgi php5-fpm

Make sure you enable the module and restart Apache:

a2enmod actions fastcgi alias
/etc/init.d/apache2 restart


*** Install mailman, squirelmail an Install PureFTPd And Quota in howtoforge


-----> Install BIND DNS Server

BIND can be installed as follows:

apt-get install bind9 dnsutils

-----> Install Vlogger, Webalizer, And AWstats

Vlogger, webalizer, and AWstats can be installed as follows:

apt-get install vlogger webalizer awstats geoip-database libclass-dbi-mysql-perl

Open /etc/cron.d/awstats afterwards...

vi /etc/cron.d/awstats

... and comment out everything in that file:

--------------------------------------------------------------------
#MAILTO=root
#*/10 * * * * www-data [ -x /usr/share/awstats/tools/update.sh ] && /usr/share/awstats/tools/update.sh
# Generate static reports:
#10 03 * * * www-data [ -x /usr/share/awstats/tools/buildstatic.sh ] && /usr/share/awstats/tools/buildstatic.sh
--------------------------------------------------------------------

-----> Install Jailkit

Jailkit is needed only if you want to chroot SSH users. It can be installed as follows (important: Jailkit must be installed before ISPConfig - it cannot be installed afterwards!):

apt-get install build-essential autoconf automake1.9 libtool flex bison debhelper binutils-gold

cd /tmp
wget http://olivier.sessink.nl/jailkit/jailkit-2.14.tar.gz
tar xvfz jailkit-2.14.tar.gz
cd jailkit-2.14
./debian/rules binary

You can now install the Jailkit .deb package as follows:

cd ..
dpkg -i jailkit_2.14-1_*.deb
rm -rf jailkit-2.14*

-----> Install fail2ban

This is optional but recommended, because the ISPConfig monitor tries to show the log:

apt-get install fail2ban

To make fail2ban monitor PureFTPd and Dovecot, create the file /etc/fail2ban/jail.local:

vi /etc/fail2ban/jail.local

--------------------------------------------------------------------
[pureftpd]
enabled  = true
port     = ftp
filter   = pureftpd
logpath  = /var/log/syslog
maxretry = 3

[dovecot-pop3imap]
enabled = true
filter = dovecot-pop3imap
action = iptables-multiport[name=dovecot-pop3imap, port="pop3,pop3s,imap,imaps", protocol=tcp]
logpath = /var/log/mail.log
maxretry = 5
--------------------------------------------------------------------


Then create the following two filter files:

vi /etc/fail2ban/filter.d/pureftpd.conf


--------------------------------------------------------------------
[Definition]
failregex = .*pure-ftpd: \(.*@<HOST>\) \[WARNING\] Authentication failed for user.*
ignoreregex =
--------------------------------------------------------------------


vi /etc/fail2ban/filter.d/dovecot-pop3imap.conf


--------------------------------------------------------------------
[Definition]
failregex = (?: pop3-login|imap-login): .*(?:Authentication failure|Aborted login \(auth failed|Aborted login \(tried to use disabled|Disconnected \(auth failed|Aborted login \(\d+ authentication attempts).*rip=(?P<host>\S*),.*
ignoreregex =
--------------------------------------------------------------------


Restart fail2ban afterwards:

/etc/init.d/fail2ban restart


-----> Install ISPConfig 3


To install ISPConfig 3 from the latest released version, do this:

cd /tmp
wget http://www.ispconfig.org/downloads/ISPConfig-3-stable.tar.gz
tar xfz ISPConfig-3-stable.tar.gz
cd ispconfig3_install/install/

The next step is to run

php -q install.php

This will start the ISPConfig 3 installer. The installer will configure all services like Postfix, Dovecot, etc. for you. A manual setup as required for ISPConfig 2 (perfect setup guides) is not necessary.

root@server1:/tmp/ispconfig3_install/install# php -q install.php


--------------------------------------------------------------------------------
 _____ ___________   _____              __ _         ____
|_   _/  ___| ___ \ /  __ \            / _(_)       /__  \
  | | \ `--.| |_/ / | /  \/ ___  _ __ | |_ _  __ _    _/ /
  | |  `--. \  __/  | |    / _ \| '_ \|  _| |/ _` |  |_ |
 _| |_/\__/ / |     | \__/\ (_) | | | | | | | (_| | ___\ \
 \___/\____/\_|      \____/\___/|_| |_|_| |_|\__, | \____/
                                              __/ |
                                             |___/
--------------------------------------------------------------------------------


>> Initial configuration

Operating System: Debian or compatible, unknown version.

    Following will be a few questions for primary configuration so be careful.
    Default values are in [brackets] and can be accepted with <ENTER>.
    Tap in "quit" (without the quotes) to stop the installer.


Select language (en,de) [en]: <-- ENTER

Installation mode (standard,expert) [standard]: <-- ENTER

Full qualified hostname (FQDN) of the server, eg server1.domain.tld  [server1.example.com]: <-- ENTER

MySQL server hostname [localhost]: <-- ENTER

MySQL root username [root]: <-- ENTER

MySQL root password []: <-- yourrootsqlpassword

MySQL database to create [dbispconfig]: <-- ENTER

MySQL charset [utf8]: <-- ENTER

Generating a 2048 bit RSA private key
...........+++
.....................+++
writing new private key to 'smtpd.key'
-----
You are about to be asked to enter information that will be incorporated
into your certificate request.
What you are about to enter is what is called a Distinguished Name or a DN.
There are quite a few fields but you can leave some blank
For some fields there will be a default value,
If you enter '.', the field will be left blank.
-----
Country Name (2 letter code) [AU]: <-- ENTER
State or Province Name (full name) [Some-State]: <-- ENTER
Locality Name (eg, city) []: <-- ENTER
Organization Name (eg, company) [Internet Widgits Pty Ltd]: <-- ENTER
Organizational Unit Name (eg, section) []: <-- ENTER
Common Name (e.g. server FQDN or YOUR name) []: <-- ENTER
Email Address []: <-- ENTER
Configuring Jailkit
Configuring Dovecot
Configuring Spamassassin
Configuring Amavisd
Configuring Getmail
Configuring Pureftpd
Configuring BIND
Configuring Apache
Configuring Vlogger
Configuring Apps vhost
Configuring Bastille Firewall
Configuring Fail2ban
Installing ISPConfig
ISPConfig Port [8080]: <-- ENTER

Do you want a secure (SSL) connection to the ISPConfig web interface (y,n) [y]: <-- ENTER

Generating RSA private key, 4096 bit long modulus
.......++
.........................................................++
e is 65537 (0x10001)
You are about to be asked to enter information that will be incorporated
into your certificate request.
What you are about to enter is what is called a Distinguished Name or a DN.
There are quite a few fields but you can leave some blank
For some fields there will be a default value,
If you enter '.', the field will be left blank.
-----
Country Name (2 letter code) [AU]: <-- ENTER
State or Province Name (full name) [Some-State]: <-- ENTER
Locality Name (eg, city) []: <-- ENTER
Organization Name (eg, company) [Internet Widgits Pty Ltd]: <-- ENTER
Organizational Unit Name (eg, section) []: <-- ENTER
Common Name (e.g. server FQDN or YOUR name) []: <-- ENTER
Email Address []: <-- ENTER

Please enter the following 'extra' attributes
to be sent with your certificate request
A challenge password []: <-- ENTER
An optional company name []: <-- ENTER
writing RSA key
Configuring DBServer
Installing ISPConfig crontab
no crontab for root
no crontab for getmail
Restarting services ...
Rather than invoking init scripts through /etc/init.d, use the service(8)
utility, e.g. service mysql restart

Since the script you are attempting to invoke has been converted to an
Upstart job, you may also use the stop(8) and then start(8) utilities,
e.g. stop mysql ; start mysql. The restart(8) utility is also available.
mysql stop/waiting
mysql start/running, process 2543
 * Stopping Postfix Mail Transport Agent postfix
/usr/sbin/postconf: warning: /etc/postfix/master.cf: unused parameter: smtpd_bind_address=127.0.0.1
   ...done.
 * Starting Postfix Mail Transport Agent postfix
postconf: warning: /etc/postfix/master.cf: unused parameter: smtpd_bind_address=127.0.0.1
/usr/sbin/postconf: warning: /etc/postfix/master.cf: unused parameter: smtpd_bind_address=127.0.0.1
   ...done.
Stopping amavisd: (not running).
The amavisd daemon is already running, PID: [1126]
Starting amavisd: (failed).
 * Stopping ClamAV daemon clamd
   ...done.
 * Starting ClamAV daemon clamd
   ...done.
Rather than invoking init scripts through /etc/init.d, use the service(8)
utility, e.g. service dovecot restart

Since the script you are attempting to invoke has been converted to an
Upstart job, you may also use the stop(8) and then start(8) utilities,
e.g. stop dovecot ; start dovecot. The restart(8) utility is also available.
dovecot stop/waiting
dovecot start/running, process 3668
 * Restarting Mailman master qrunner mailmanctl
 * Waiting...
   ...done.
   ...done.
 * Restarting web server apache2
 ... waiting .   ...done.
Restarting ftp server: Running: /usr/sbin/pure-ftpd-mysql-virtualchroot -l mysql:/etc/pure-ftpd/db/mysql.conf -l pam -E -H -Y 1 -O clf:/var/log/pure-ftpd/transfer.log -8 UTF-8 -b -D -A -u 1000 -B
Installation completed.
root@server1:/tmp/ispconfig3_install/install#

The installer automatically configures all underlying services, so no manual configuration is needed.

You now also have the possibility to let the installer create an SSL vhost for the ISPConfig control panel, so that ISPConfig can be accessed using https:// instead of http://. To achieve this, just press ENTER when you see this question: Do you want a secure (SSL) connection to the ISPConfig web interface (y,n) [y]:.

Afterwards you can access ISPConfig 3 under http(s)://server1.example.com:8080/ or http(s)://192.168.0.100:8080/ ( http or https depends on what you chose during installation). Log in with the username admin and the password admin (you should change the default password after your first login):


ISPConfig 3 Manual

In order to learn how to use ISPConfig 3, I strongly recommend to download the ISPConfig 3 Manual.

On more than 300 pages, it covers the concept behind ISPConfig (admin, resellers, clients), explains how to install and update ISPConfig 3, includes a reference for all forms and form fields in ISPConfig together with examples of valid inputs, and provides tutorials for the most common tasks in ISPConfig 3. It also lines out how to make your server more secure and comes with a troubleshooting section at the end.


-----> ISPConfig Monitor App For Android

With the ISPConfig Monitor App, you can check your server status and find out if all services are running as expected. You can check TCP and UDP ports and ping your servers. In addition to that you can use this app to request details from servers that have ISPConfig installed (please note that the minimum installed ISPConfig 3 version with support for the ISPConfig Monitor App is 3.0.3.3!); these details include everything you know from the Monitor module in the ISPConfig Control Panel (e.g. services, mail and system logs, mail queue, CPU and memory info, disk usage, quota, OS details, RKHunter log, etc.), and of course, as ISPConfig is multiserver-capable, you can check all servers that are controlled from your ISPConfig master server.

For download and usage instructions, please visit http://www.ispconfig.org/ispconfig-3/ispconfig-monitor-app-for-android/.


-----> Additional Notes
-----> -> OpenVZ

If the Ubuntu server that you've just set up in this tutorial is an OpenVZ container (virtual machine), you should do this on the host system (I'm assuming that the ID of the OpenVZ container is 101 - replace it with the correct VPSID on your system):

VPSID=101
for CAP in CHOWN DAC_READ_SEARCH SETGID SETUID NET_BIND_SERVICE NET_ADMIN SYS_CHROOT SYS_NICE CHOWN DAC_READ_SEARCH SETGID SETUID NET_BIND_SERVICE NET_ADMIN SYS_CHROOT SYS_NICE
do
  vzctl set $VPSID --capability ${CAP}:on --save
done


-----> Links

    Ubuntu: http://www.ubuntu.com/
    ISPConfig: http://www.ispconfig.org/
    url : http://www.howtoforge.com/perfect-server-ubuntu-12.04-lts-apache2-bind-dovecot-ispconfig-3-p7
Minggu, 09 Maret 2014

1. Masukkan ekstensi file di Layer 7 agar tertangkap oleh router ketika melewatinya

   
/ip firewall layer7-protocol
/ip firewall layer7-protocol add comment="" name="Extension \" .exe \"" regexp="\\.(exe)"
/ip firewall layer7-protocol add comment="" name="Extension \" .rar \"" regexp="\\.(rar)"
/ip firewall layer7-protocol add comment="" name="Extension \" .zip \"" regexp="\\.(zip)"
/ip firewall layer7-protocol add comment="" name="Extension \" .7z \"" regexp="\\.(7z)"
/ip firewall layer7-protocol add comment="" name="Extension \" .cab \"" regexp="\\.(cab)"
/ip firewall layer7-protocol add comment="" name="Extension \" .asf \"" regexp="\\.(asf)"
/ip firewall layer7-protocol add comment="" name="Extension \" .mov \"" regexp="\\.(mov)"
/ip firewall layer7-protocol add comment="" name="Extension \" .wmv \"" regexp="\\.(wmv)"
/ip firewall layer7-protocol add comment="" name="Extension \" .mpg \"" regexp="\\.(mpg)"
/ip firewall layer7-protocol add comment="" name="Extension \" .mpeg \"" regexp="\\.(mpeg)"
/ip firewall layer7-protocol add comment="" name="Extension \" .mkv \"" regexp="\\.(mkv)"
/ip firewall layer7-protocol add comment="" name="Extension \" .avi \"" regexp="\\.(avi)"
/ip firewall layer7-protocol add comment="" name="Extension \" .flv \"" regexp="\\.(flv)"
/ip firewall layer7-protocol add comment="" name="Extension \" .pdf \"" regexp="\\.(pdf)"
/ip firewall layer7-protocol add comment="" name="Extension \" .wav \"" regexp="\\.(wav)"
/ip firewall layer7-protocol add comment="" name="Extension \" .rm \"" regexp="\\.(rm)"
/ip firewall layer7-protocol add comment="" name="Extension \" .mp3 \"" regexp="\\.(mp3)"
/ip firewall layer7-protocol add comment="" name="Extension \" .mp4 \"" regexp="\\.(mp4)"
/ip firewall layer7-protocol add comment="" name="Extension \" .ram \"" regexp="\\.(ram)"
/ip firewall layer7-protocol add comment="" name="Extension \" .rmvb \"" regexp="\\.(rmvb)"
/ip firewall layer7-protocol add comment="" name="Extension \" .dat \"" regexp="\\.(dat)"
/ip firewall layer7-protocol add comment="" name="Extension \" .daa \"" regexp="\\.(daa)"
/ip firewall layer7-protocol add comment="" name="Extension \" .iso \"" regexp="\\.(iso)"
/ip firewall layer7-protocol add comment="" name="Extension \" .nrg \"" regexp="\\.(nrg)"
/ip firewall layer7-protocol add comment="" name="Extension \" .bin \"" regexp="\\.(bin)"
/ip firewall layer7-protocol add comment="" name="Extension \" .vcd \"" regexp="\\.(vcd)"
/ip firewall layer7-protocol add comment="" name="Extension \" .mp2 \"" regexp="\\.(mp2)"
/ip firewall layer7-protocol add comment="" name="Extension \" .3gp \"" regexp="\\.(3gp)"
/ip firewall layer7-protocol add comment="" name="Extension \" .mpe \"" regexp="\\.(mpe)"
/ip firewall layer7-protocol add comment="" name="Extension \" .qt \"" regexp="\\.(qt)"
/ip firewall layer7-protocol add comment="" name="Extension \" .raw \"" regexp="\\.(raw)"
/ip firewall layer7-protocol add comment="" name="Extension \" .wma \"" regexp="\\.(wma)"
/ip firewall layer7-protocol add comment="" name="Extension \" .ogg \"" regexp="\\.(ogg)"
/ip firewall layer7-protocol add comment="" name="Extension \" .doc \"" regexp="\\.(doc)"


2. Set IP jaringan di Address List pada Firewall

1.1.1.1 = ip public
2.2.2.2 = ip mikrotik / ip webproxy (jika menggunakan webproxy external berarti harus ditambahkan ipnya di list ” bypass ”
3.3.0.0/24 = range ip jaringan lokal
Jangan lupa untuk memasukkan IP Public, IP Mikrotik atau IP Webproxy ke dalam list ” bypass ”
   
/ip firewall address-list
/ip firewall address-list add address=192.168.1.2/24 comment="" disabled=no list=bypass
/ip firewall address-list add address=192.168.1.254 comment="" disabled=no list=bypass
/ip firewall address-list add address=192.168.1.254 comment="" disabled=no list=skip_content_download
/ip firewall address-list add address=192.168.2.0/24 comment="" disabled=no list=skip_content_download

3. Pasang Filter di Firewall untuk menjaring ekstensi yang sedang didownload yang melalui Router Mikrotik

   
/ip firewall filter

/ip firewall filter add action=add-dst-to-address-list address-list=content_download address-list-timeout=5s chain=forward comment="" disabled=no dst-address-list=\
    !skip_content_download layer7-protocol="Extension \" .mp3 \"" protocol=tcp
/ip firewall filter add action=add-dst-to-address-list address-list=content_download address-list-timeout=5s chain=forward comment="" disabled=no dst-address-list=\
    !skip_content_download layer7-protocol="Extension \" .avi \"" protocol=tcp
/ip firewall filter add action=add-dst-to-address-list address-list=content_download address-list-timeout=5s chain=forward comment="" disabled=no dst-address-list=\
    !skip_content_download layer7-protocol="Extension \" .flv \"" protocol=tcp
/ip firewall filter add action=add-dst-to-address-list address-list=content_download address-list-timeout=5s chain=forward comment="" disabled=no dst-address-list=\
    !skip_content_download layer7-protocol="Extension \" .iso \"" protocol=tcp
/ip firewall filter add action=add-dst-to-address-list address-list=content_download address-list-timeout=5s chain=forward comment="" disabled=no dst-address-list=\
    !skip_content_download layer7-protocol="Extension \" .pdf \"" protocol=tcp
/ip firewall filter add action=add-dst-to-address-list address-list=content_download address-list-timeout=5s chain=forward comment="" disabled=no dst-address-list=\
    !skip_content_download layer7-protocol="Extension \" .mpeg \"" protocol=tcp
/ip firewall filter add action=add-dst-to-address-list address-list=content_download address-list-timeout=5s chain=forward comment="" disabled=no dst-address-list=\
    !skip_content_download layer7-protocol="Extension \" .exe \"" protocol=tcp
/ip firewall filter add action=add-dst-to-address-list address-list=content_download address-list-timeout=5s chain=forward comment="" disabled=no dst-address-list=\
    !skip_content_download layer7-protocol="Extension \" .rar \"" protocol=tcp
/ip firewall filter add action=add-dst-to-address-list address-list=content_download address-list-timeout=5s chain=forward comment="" disabled=no dst-address-list=\
    !skip_content_download layer7-protocol="Extension \" .zip \"" protocol=tcp
/ip firewall filter add action=add-dst-to-address-list address-list=content_download address-list-timeout=5s chain=forward comment="" disabled=no dst-address-list=\
    !skip_content_download layer7-protocol="Extension \" .mp4 \"" protocol=tcp
/ip firewall filter add action=add-dst-to-address-list address-list=content_download address-list-timeout=5s chain=forward comment="" disabled=no dst-address-list=\
    !skip_content_download layer7-protocol="Extension \" .mp2 \"" protocol=tcp
/ip firewall filter add action=add-dst-to-address-list address-list=content_download address-list-timeout=5s chain=forward comment="" disabled=no dst-address-list=\
    !skip_content_download layer7-protocol="Extension \" .3gp \"" protocol=tcp
/ip firewall filter add action=add-dst-to-address-list address-list=content_download address-list-timeout=5s chain=forward comment="" disabled=no dst-address-list=\
    !skip_content_download layer7-protocol="Extension \" .mov \"" protocol=tcp
/ip firewall filter add action=add-dst-to-address-list address-list=content_download address-list-timeout=5s chain=forward comment="" disabled=no dst-address-list=\
    !skip_content_download layer7-protocol="Extension \" .mpe \"" protocol=tcp
/ip firewall filter add action=add-dst-to-address-list address-list=content_download address-list-timeout=5s chain=forward comment="" disabled=no dst-address-list=\
    !skip_content_download layer7-protocol="Extension \" .mpg \"" protocol=tcp
/ip firewall filter add action=add-dst-to-address-list address-list=content_download address-list-timeout=5s chain=forward comment="" disabled=no dst-address-list=\
    !skip_content_download layer7-protocol="Extension \" .qt \"" protocol=tcp
/ip firewall filter add action=add-dst-to-address-list address-list=content_download address-list-timeout=5s chain=forward comment="" disabled=no dst-address-list=\
    !skip_content_download layer7-protocol="Extension \" .ram \"" protocol=tcp
/ip firewall filter add action=add-dst-to-address-list address-list=content_download address-list-timeout=5s chain=forward comment="" disabled=no dst-address-list=\
    !skip_content_download layer7-protocol="Extension \" .rm \"" protocol=tcp
/ip firewall filter add action=add-dst-to-address-list address-list=content_download address-list-timeout=5s chain=forward comment="" disabled=no dst-address-list=\
    !skip_content_download layer7-protocol="Extension \" .raw \"" protocol=tcp
/ip firewall filter add action=add-dst-to-address-list address-list=content_download address-list-timeout=5s chain=forward comment="" disabled=no dst-address-list=\
    !skip_content_download layer7-protocol="Extension \" .wav \"" protocol=tcp
/ip firewall filter add action=add-dst-to-address-list address-list=content_download address-list-timeout=5s chain=forward comment="" disabled=no dst-address-list=\
    !skip_content_download layer7-protocol="Extension \" .wmv \"" protocol=tcp
/ip firewall filter add action=add-dst-to-address-list address-list=content_download address-list-timeout=5s chain=forward comment="" disabled=no dst-address-list=\
    !skip_content_download layer7-protocol="Extension \" .wma \"" protocol=tcp
/ip firewall filter add action=add-dst-to-address-list address-list=content_download address-list-timeout=5s chain=forward comment="" disabled=no dst-address-list=\
    !skip_content_download layer7-protocol="Extension \" .ogg \"" protocol=tcp
/ip firewall filter add action=add-dst-to-address-list address-list=content_download address-list-timeout=5s chain=forward comment="" disabled=no dst-address-list=\
    !skip_content_download layer7-protocol="Extension \" .doc \"" protocol=tcp
/ip firewall filter add action=add-dst-to-address-list address-list=content_download address-list-timeout=5s chain=forward comment="" disabled=no dst-address-list=\
    !skip_content_download layer7-protocol="Extension \" .7z \"" protocol=tcp
/ip firewall filter add action=add-dst-to-address-list address-list=content_download address-list-timeout=5s chain=forward comment="" disabled=no dst-address-list=\
    !skip_content_download layer7-protocol="Extension \" .asf \"" protocol=tcp
/ip firewall filter add action=add-dst-to-address-list address-list=content_download address-list-timeout=5s chain=forward comment="" disabled=no dst-address-list=\
    !skip_content_download layer7-protocol="Extension \" .bin \"" protocol=tcp
/ip firewall filter add action=add-dst-to-address-list address-list=content_download address-list-timeout=5s chain=forward comment="" disabled=no dst-address-list=\
    !skip_content_download layer7-protocol="Extension \" .cab \"" protocol=tcp
/ip firewall filter add action=add-dst-to-address-list address-list=content_download address-list-timeout=5s chain=forward comment="" disabled=no dst-address-list=\
    !skip_content_download layer7-protocol="Extension \" .daa \"" protocol=tcp
/ip firewall filter add action=add-dst-to-address-list address-list=content_download address-list-timeout=5s chain=forward comment="" disabled=no dst-address-list=\
    !skip_content_download layer7-protocol="Extension \" .dat \"" protocol=tcp
/ip firewall filter add action=add-dst-to-address-list address-list=content_download address-list-timeout=5s chain=forward comment="" disabled=no dst-address-list=\
    !skip_content_download layer7-protocol="Extension \" .mkv \"" protocol=tcp
/ip firewall filter add action=add-dst-to-address-list address-list=content_download address-list-timeout=5s chain=forward comment="" disabled=no dst-address-list=\
    !skip_content_download layer7-protocol="Extension \" .nrg \"" protocol=tcp
/ip firewall filter add action=add-dst-to-address-list address-list=content_download address-list-timeout=5s chain=forward comment="" disabled=no dst-address-list=\
    !skip_content_download layer7-protocol="Extension \" .rmvb \"" protocol=tcp
/ip firewall filter add action=add-dst-to-address-list address-list=content_download address-list-timeout=5s chain=forward comment="" disabled=no dst-address-list=\
    !skip_content_download layer7-protocol="Extension \" .vcd \"" protocol=tcp
   

4. Set Mangle di Mikrotik

   
/ip firewall mangle

/ip firewall mangle add action=mark-connection chain=prerouting comment=Content_download disabled=no dst-address-list=content_download new-connection-mark=\
    Bw_Download passthrough=yes protocol=tcp

/ip firewall mangle add action=mark-connection chain=prerouting comment="" connection-bytes=262146-4294967295 disabled=no dst-address-list=!bypass new-connection-mark=\
    Bw_Download passthrough=yes protocol=!icmp
/ip firewall mangle add action=mark-packet chain=prerouting comment="" connection-mark=Bw_Download disabled=no dst-address-list=!bypass new-packet-mark=Paket_Download \
    passthrough=no
/ip firewall mangle add action=mark-connection chain=prerouting comment=Content_browsing disabled=no dst-address-list=!bypass new-connection-mark=Bw_Browsing passthrough=yes \
    protocol=!icmp
/ip firewall mangle add action=mark-packet chain=prerouting comment="" connection-mark=Bw_Browsing disabled=no dst-address-list=!bypass new-packet-mark=Paket_Browsing \
    passthrough=no

5. Set PCQ dan Queue

   
/queue type
/queue type add kind=pcq name=pcq-down pcq-classifier=dst-address pcq-limit=50 pcq-rate=256000 pcq-total-limit=2000
/queue type add kind=pcq name=Pcq_Browsing_Down pcq-classifier=dst-address pcq-li
   
/queue tree
/queue tree add burst-limit=0 burst-threshold=0 burst-time=0s disabled=no limit-at=0 max-limit=0 name=DOWN parent=LOCAL priority=8
/queue tree add burst-limit=0 burst-threshold=0 burst-time=0s disabled=no limit-at=0 max-limit=0 name=Browsing_Down packet-mark=Paket_Browsing parent=DOWN priority=5 \
    queue=Pcq_Browsing_Down
/queue tree add burst-limit=0 burst-threshold=0 burst-time=0s disabled=no max-limit=256k name=Regular_Down packet-mark=Paket_Download parent=DOWN \
    priority=8 queue=pcq-down

Kalau aku sendiri cukup menggunakan Simple Queue dengan masing2 Connection Mark adalah ” Paket_Browsing ” dan ” Paket_Download ” dan terbukti ampuh juga.

Sampai disini langkah untuk membatasi Download sudah selesai …… silahkan cek paket2 yang melalui mangle apakah sudah berjalan.

Sebagai tambahan, seandainya cukup terganggu dengan pengguna IDM … bisa memasukkan perintah berikut pada Firewall

/ip firewall filter
/ip firewall filter add action=drop chain=forward comment="" connection-limit=4,32 disabled=no in-interface=local layer7-protocol="Extension \" .exe \"" protocol=tcp
/ip firewall filter add action=drop chain=forward comment="" connection-limit=4,32 disabled=no in-interface=local layer7-protocol="Extension \" .3gp \"" protocol=tcp
/ip firewall filter add action=drop chain=forward comment="" connection-limit=4,32 disabled=no in-interface=local layer7-protocol="Extension \" .7z \"" protocol=tcp
/ip firewall filter add action=drop chain=forward comment="" connection-limit=4,32 disabled=no in-interface=LOCAL layer7-protocol="Extension \" .asf \"" protocol=tcp
/ip firewall filter add action=drop chain=forward comment="" connection-limit=4,32 disabled=no in-interface=LOCAL layer7-protocol="Extension \" .avi \"" protocol=tcp
/ip firewall filter add action=drop chain=forward comment="" connection-limit=4,32 disabled=no in-interface=LOCAL layer7-protocol="Extension \" .bin \"" protocol=tcp
/ip firewall filter add action=drop chain=forward comment="" connection-limit=4,32 disabled=no in-interface=LOCAL layer7-protocol="Extension \" .cab \"" protocol=tcp
/ip firewall filter add action=drop chain=forward comment="" connection-limit=4,32 disabled=no in-interface=LOCAL layer7-protocol="Extension \" .daa \"" protocol=tcp
/ip firewall filter add action=drop chain=forward comment="" connection-limit=4,32 disabled=no in-interface=LOCAL layer7-protocol="Extension \" .dat \"" protocol=tcp
/ip firewall filter add action=drop chain=forward comment="" connection-limit=4,32 disabled=no in-interface=LOCAL layer7-protocol="Extension \" .doc \"" protocol=tcp
/ip firewall filter add action=drop chain=forward comment="" connection-limit=4,32 disabled=no in-interface=LOCAL layer7-protocol="Extension \" .flv \"" protocol=tcp
/ip firewall filter add action=drop chain=forward comment="" connection-limit=4,32 disabled=no in-interface=LOCAL layer7-protocol="Extension \" .iso \"" protocol=tcp
/ip firewall filter add action=drop chain=forward comment="" connection-limit=4,32 disabled=no in-interface=LOCAL layer7-protocol="Extension \" .mkv \"" protocol=tcp
/ip firewall filter add action=drop chain=forward comment="" connection-limit=4,32 disabled=no in-interface=LOCAL layer7-protocol="Extension \" .mov \"" protocol=tcp
/ip firewall filter add action=drop chain=forward comment="" connection-limit=4,32 disabled=no in-interface=LOCAL layer7-protocol="Extension \" .mp2 \"" protocol=tcp
/ip firewall filter add action=drop chain=forward comment="" connection-limit=4,32 disabled=no in-interface=LOCAL layer7-protocol="Extension \" .mp3 \"" protocol=tcp
/ip firewall filter add action=drop chain=forward comment="" connection-limit=4,32 disabled=no in-interface=LOCAL layer7-protocol="Extension \" .mp4 \"" protocol=tcp
/ip firewall filter add action=drop chain=forward comment="" connection-limit=4,32 disabled=no in-interface=LOCAL layer7-protocol="Extension \" .mpe \"" protocol=tcp
/ip firewall filter add action=drop chain=forward comment="" connection-limit=4,32 disabled=no in-interface=LOCAL layer7-protocol="Extension \" .mpeg \"" protocol=tcp
/ip firewall filter add action=drop chain=forward comment="" connection-limit=4,32 disabled=no in-interface=LOCAL layer7-protocol="Extension \" .mpg \"" protocol=tcp
/ip firewall filter add action=drop chain=forward comment="" connection-limit=4,32 disabled=no in-interface=LOCAL layer7-protocol="Extension \" .nrg \"" protocol=tcp
/ip firewall filter add action=drop chain=forward comment="" connection-limit=4,32 disabled=no in-interface=LOCAL layer7-protocol="Extension \" .ogg \"" protocol=tcp
/ip firewall filter add action=drop chain=forward comment="" connection-limit=4,32 disabled=no in-interface=LOCAL layer7-protocol="Extension \" .pdf \"" protocol=tcp
/ip firewall filter add action=drop chain=forward comment="" connection-limit=4,32 disabled=no in-interface=LOCAL layer7-protocol="Extension \" .qt \"" protocol=tcp
/ip firewall filter add action=drop chain=forward comment="" connection-limit=4,32 disabled=no in-interface=LOCAL layer7-protocol="Extension \" .ram \"" protocol=tcp
/ip firewall filter add action=drop chain=forward comment="" connection-limit=4,32 disabled=no in-interface=LOCAL layer7-protocol="Extension \" .rar \"" protocol=tcp
/ip firewall filter add action=drop chain=forward comment="" connection-limit=4,32 disabled=no in-interface=LOCAL layer7-protocol="Extension \" .raw \"" protocol=tcp
/ip firewall filter add action=drop chain=forward comment="" connection-limit=4,32 disabled=no in-interface=LOCAL layer7-protocol="Extension \" .rm \"" protocol=tcp
/ip firewall filter add action=drop chain=forward comment="" connection-limit=4,32 disabled=no in-interface=LOCAL layer7-protocol="Extension \" .rmvb \"" protocol=tcp
/ip firewall filter add action=drop chain=forward comment="" connection-limit=4,32 disabled=no in-interface=LOCAL layer7-protocol="Extension \" .vcd \"" protocol=tcp
/ip firewall filter add action=drop chain=forward comment="" connection-limit=4,32 disabled=no in-interface=LOCAL layer7-protocol="Extension \" .wav \"" protocol=tcp
/ip firewall filter add action=drop chain=forward comment="" connection-limit=4,32 disabled=no in-interface=LOCAL layer7-protocol="Extension \" .wma \"" protocol=tcp
/ip firewall filter add action=drop chain=forward comment="" connection-limit=4,32 disabled=no in-interface=LOCAL layer7-protocol="Extension \" .wmv \"" protocol=tcp
/ip firewall filter add action=drop chain=forward comment="" connection-limit=4,32 disabled=no in-interface=LOCAL layer7-protocol="Extension \" .zip \"" protocol=tcp

Mungkin cukup segitu dulu tutorialnya, maaf kalo agak BASBANG …. semoga bermanfaat.

Minggu, 02 Maret 2014

Merasa jengkel dengan user yg mendownload file secara besar dan menggunakan Download Manager pasti susah di atasi.

berikut cara limit ekstensi yang paling sering di download.
saya menggunakan mikroitk versi 4 running d RB 750G.

Pertama tandai ekstensi


1/ip firewall layer7-protocol
2add comment="" name=High regexp="^.*get.+\\.(exe|rar|iso|zip|7zip|0[0-9][1-9]|flv|mkv|avi|mp4|3gp|rmvb|mp3|img|dat|mov).*\$"
3add comment="" name=Mid regexp="^.*get.+\\.(zip|rar|7z).*\$"
4add comment="" name=End regexp="^.*get.+\\.(pdf|doc|docx|xlsx|xls|rtf|ppt|ppt).*\$"
5add comment="" name=Video regexp="http/(0\\.9|1\\.0|1\\.1)[\\x09-\\x0d ][1-5][0-9][0-9][\\x09-\\x0d -~]*(content-type: video)"

Menggunakan Regular Expersion silahkan googling untuk penjelasanya.
High = File yg biasa berukuran besar dan paling sering didownload
Mid = File bertype zip rar 7z berukuran hanya sampai 10 MB jika lebih akan dilimit
End = File yg tidak ingin di limit
Video = Stream Video

Kedua tandai mangle


1/ip firewall mangle
2add action=mark-packet chain=forward comment="High Eks" disabled=no dst-address-list=!Bypass layer7-protocol=High new-packet-mark=High-Ext passthrough=no protocol=tcp
3add action=mark-packet chain=forward comment="Mid Eks" connection-bytes=10485760-4294967295 disabled=no layer7-protocol=Mid new-packet-mark=Mid-Ext passthrough=no protocol=tcp
4add action=mark-packet chain=forward comment="Low Eks" disabled=no layer7-protocol=End new-packet-mark=End-Ext passthrough=no protocol=tcp
5add action=mark-packet chain=forward comment=Video disabled=no layer7-protocol=Video new-packet-mark=Video passthrough=no protocol=tcp src-address-list=!Bypass

Ketiga Buat PCQ dan Simple untuk limit/jepit ekstensi


1/queue type add kind=pcq name=PCQ_Limit_Video pcq-classifier=dst-address pcq-limit=50 pcq-rate=64000 pcq-total-limit=2000
2 
3/queue simple
4add burst-limit=0/0 burst-threshold=0/0 burst-time=0s/0s comment="" direction=both disabled=no dst-address=0.0.0.0/0 interface=all limit-at=0/0 max-limit=64k/64k name=High packet-marks=High-Ext parent=none priority=8 queue=default-small/default-small total-queue=default-small
5add burst-limit=0/0 burst-threshold=0/0 burst-time=0s/0s comment="" direction=both disabled=no dst-address=0.0.0.0/0 interface=all limit-at=0/0 max-limit=128k/128k name=Mid packet-marks=Mid-Ext parent=none priority=5 queue=default-small/default-small total-queue=default-small
6add burst-limit=0/0 burst-threshold=0/0 burst-time=0s/0s comment="" direction=both disabled=no dst-address=0.0.0.0/0 interface=all limit-at=0/0 max-limit=1M/1M name=End packet-marks=End-Ext parent=none priority=2 queue=default-small/default-small total-queue=default-small
7add burst-limit=0/0 burst-threshold=0/0 burst-time=0s/0s comment="" direction=both disabled=no dst-address=0.0.0.0/0 interface=all limit-at=0/0 max-limit=64k/64k name=Video packet-marks=Video parent=none priority=8 queue=default-small/PCQ_Limit_Video total-queue=default-small
Untuk jatah limit / jepit sesuaikan dengan keinginan anda.

untuk script download disini

Kamis, 20 Februari 2014

Mikrotik Policy-Based Routing 2 ISP

2 ISP --->  2 LAN local
What we want to have happen is for all machines in the IP range 192.168.88.100 through 192.168.88.150 to use ISP1 (192.168.25.1), and all machines in the IP range 192.168.88.151 through 192.168.88.200 to use ISP2 (192.168.50.1).
So, our interface IP assignments could be something like this:

/ip address
add address=192.168.88.1/24 disabled=no interface=LAN network=192.168.88.0
add address=192.168.25.1/24 disabled=no interface=WAN1 network=192.168.25.0
add address=192.168.50.1/24 disabled=no interface=WAN2 network=192.168.50.0
First, let’s get some address lists going in IP > Firewall > Address Lists

/ip firewall address-list
add address=192.168.88.100-192.168.88.150 comment="Use ISP 1" disabled=no list=patron
add address=192.168.88.151-192.168.88.200 comment="Use ISP 2" disabled=no list=staff
Now, let’s set up routing marks based on the address lists above:

/ip firewall mangle
add action=mark-routing chain=prerouting comment=ISP1 disabled=no new-routing-mark=ISP1 passthrough=yes src-address-list=patron
add action=mark-routing chain=prerouting comment=ISP2 disabled=no new-routing-mark=ISP2 passthrough=yes src-address-list=staff
Finally, we add default routes based on the routing mark of the packets:

/ip route
add disabled=no distance=1 dst-address=0.0.0.0/0 gateway=192.168.25.1 routing-mark=ISP1 scope=30 target-scope=10
add disabled=no distance=1 dst-address=0.0.0.0/0 gateway=192.168.50.1 routing-mark=ISP2 scope=30 target-scope=10
Another way we could use policy-based routing would be for routing packets through a filtering proxy. Suppose we have a transparent Squid proxy set up for content filtering in our network. We have would need to set up four interfaces including WAN, LAN, and two more to loop the packets out to the Squid box and back into the router. Our diagram is something like this:
Our interface list:

/ip address
add address=192.168.88.1/24 disabled=no interface=LAN network=192.168.88.0 comment="LAN"
add address=192.168.25.1/24 disabled=no interface=WAN network=192.168.25.0 comment="WAN"
add address=192.168.101.1/24 disabled=no interface=F-Out network=192.168.101.0 comment="Filter Out"
add address=192.168.102.1/24 disabled=no interface-F-In network=192.168.102.0 comment="Filter In"
What we would do is cable the filter-out (F-Out) interface of the router to the LAN port of the Squid box (assigned IP 192.168.101.2). Then, cable the Squid box WAN port (assigned IP 192.168.102.2) back to the filter-in (F-In) interface of the router. This creates a detour path to route our packets through if we wish to filter them. Then, set up an address-list for filtered machines, as well as routing marks in mangle:

/ip firewall address-list
add address=192.168.88.100-192.168.88.150 comment="Filtered" disabled=no list=patron
/ip firewall mangle
add action=mark-routing chain=prerouting comment=Filtered disabled=no new-routing-mark=Filtered passthrough=yes src-address-list=patron
Notice in this example that we need only create address-lists and mangle rules for machines we wish to detour through the Squid box as all other packets will exit the router directly through the WAN port and out to the Internet like normal.
Now, we set one routing rule for the detour, using the Squid box LAN IP as our gateway:


/ip route
add disabled=no distance=1 dst-address=0.0.0.0/0 gateway=192.168.101.2 routing-mark=Filtered scope=30 target-scope=10

Senin, 03 Februari 2014

Mikrotik RouterOS Multi-WAN PPC

Mikrotik RouterOS Multi-WAN PPC howto


This guide assumes the following:

"ISP1" is your 1st wan connection name
"ISP2" is your 2nd wan connection name
"LAN" is your local network name

"ISP1" recieves the IP 111.111.111.1/24 on the network 111.111.111.0/24
"ISP2" recieves the IP 222.222.222.1/24 on the network 222.222.222.0/24

1. If your ISP assigned IP's via DHCP be sure to do the following (if they are assigned static move to step 2):

Log into the routeros webfig or winbox:
  • IP
  • DHCP Client
  • Click on your first WAN DHCP client
  • Change "add default gateway" to no
  • Repeat the same for your second WAN connection

2. Remove current routing rules
  • IP
  • Firewall
  • Nat
  • Remove the entry for "masquerade" to your current single ISP.

3. SSH into your router and run the following script:
Code:
/ ip firewall mangle
add chain=prerouting dst-address=111.111.111.0/24  action=accept in-interface=LAN
add chain=prerouting dst-address=222.222.222.0/24  action=accept in-interface=LAN
add chain=prerouting in-interface=ISP1 connection-mark=no-mark action=mark-connection new-connection-mark=ISP1_conn
add chain=prerouting in-interface=ISP2 connection-mark=no-mark action=mark-connection new-connection-mark=ISP2_conn
add chain=prerouting  in-interface=LAN connection-mark=no-mark dst-address-type=!local per-connection-classifier=both-addresses:2/0 action=mark-connection new-connection-mark=ISP1_conn
add chain=prerouting  in-interface=LAN connection-mark=no-mark dst-address-type=!local per-connection-classifier=both-addresses:2/1 action=mark-connection new-connection-mark=ISP2_conn
add chain=prerouting connection-mark=ISP1_conn in-interface=LAN action=mark-routing new-routing-mark=to_ISP1
add chain=prerouting connection-mark=ISP2_conn in-interface=LAN action=mark-routing new-routing-mark=to_ISP2
add chain=output connection-mark=ISP1_conn action=mark-routing new-routing-mark=to_ISP1     
add chain=output connection-mark=ISP2_conn action=mark-routing new-routing-mark=to_ISP2

/ ip route
add dst-address=0.0.0.0/0 gateway=111.111.111.1 routing-mark=to_ISP1 check-gateway=ping
add dst-address=0.0.0.0/0 gateway=222.222.222.1 routing-mark=to_ISP2 check-gateway=ping
add dst-address=0.0.0.0/0 gateway=111.111.111.1 distance=1 check-gateway=ping
add dst-address=0.0.0.0/0 gateway=222.222.222.1 distance=2 check-gateway=ping

/ ip firewall nat 
add chain=srcnat out-interface=ISP1 action=masquerade
add chain=srcnat out-interface=ISP2 action=masquerade
This script assumes that you have 2 equal WAN connections(ex. two 7/1 DSL lines). If you have unbalanced connections you can modify the section of the script that defines how the traffic is balanced. That starts on line 6.

For example I have a 45/6 connection and a 30/6 connection and I have the following lines( Note that there are 5 lines and the first one starts at 5/0 and moves on from there):

Code:
add chain=prerouting  in-interface=LAN connection-mark=no-mark dst-address-type=!local per-connection-classifier=both-addresses:5/0 action=mark-connection new-connection-mark=ISP1_conn
add chain=prerouting  in-interface=LAN connection-mark=no-mark dst-address-type=!local per-connection-classifier=both-addresses:5/1 action=mark-connection new-connection-mark=ISP2_conn
add chain=prerouting  in-interface=LAN connection-mark=no-mark dst-address-type=!local per-connection-classifier=both-addresses:5/2 action=mark-connection new-connection-mark=ISP1_conn
add chain=prerouting  in-interface=LAN connection-mark=no-mark dst-address-type=!local per-connection-classifier=both-addresses:5/3 action=mark-connection new-connection-mark=ISP2_conn
add chain=prerouting  in-interface=LAN connection-mark=no-mark dst-address-type=!local per-connection-classifier=both-addresses:5/4 action=mark-connection new-connection-mark=ISP1_conn
The PCC method automatically does failover. All around good way to load balance 2 connections. You can also balance more connections by configuring the script correctly.   

from:
http://hardforum.com/showthread.php?p=1040363288